Groups and Users
Creation and Editing
This section is the administrative center of your application. Here, you manage credentials, privilege levels, and audit activities performed on the system, ensuring that each user has access to exactly what they need.
Requirements
- Access to Neptune: You must be logged into your instance and have Administrator permissions.
- Created Application: You must have a previously created application. Learn more: Interface Guide: Create Application.
- Forms: Have at least one or two forms created. Learn more: Interface Guide: Create Form.
Menu
Allows access to settings for security management, users, groups, and log monitoring.
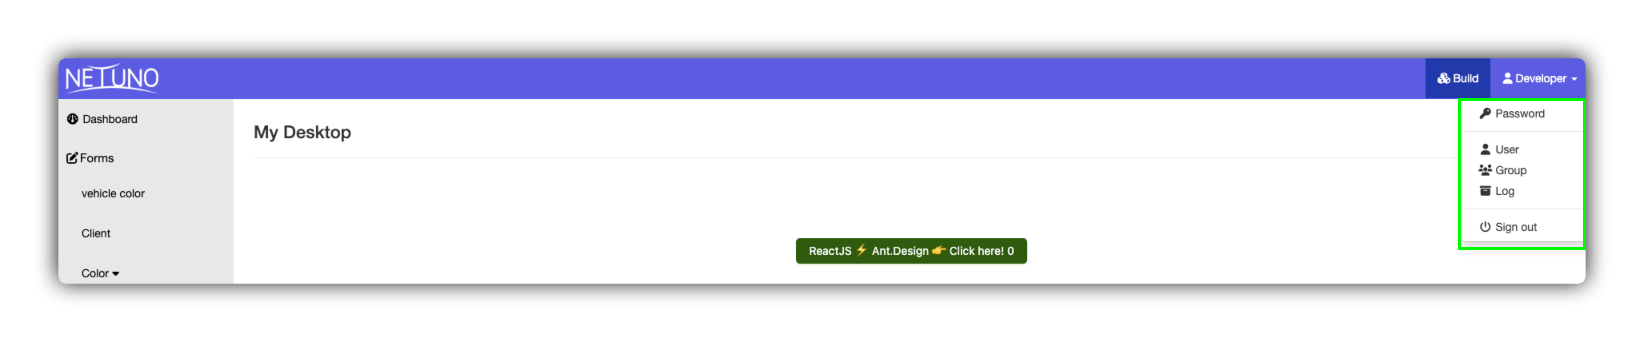
Access "View Mode" and click on "Developer" in the upper right corner of the screen.
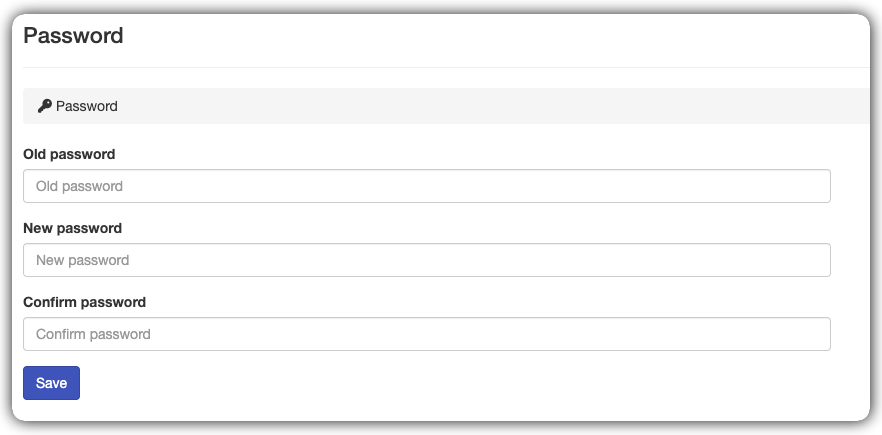
Password
Allows you to change your system access password.
By clicking on "Developer" in the upper right corner of the screen, access the "Password" section.
- Enter your old password.
- Enter your new password. It must have at least 8 characters including numbers, uppercase and lowercase letters, and special characters.
- Confirm the password and click the Save button.
- After this action, a success message will be displayed.
User
This section is the control center for managing user profiles.
By clicking on "Developer" in the upper right corner of the screen, access the "User" section.
Requirements
- The user to be edited must be previously registered in the database.
1 - Edit existing user
This section describes how to locate and update the information of a user who is already registered in the system.

How to edit a user:
- Select a registered user and change the existing information.
- Click the "Save" button to confirm the change.
- After this action, a success message will be displayed.
Add new user: The basic account identification fields (Name, Username, Password, Email, Group).
2 - Add a new user
This section allows you to register new users, defining their access credentials and permission levels within the system.
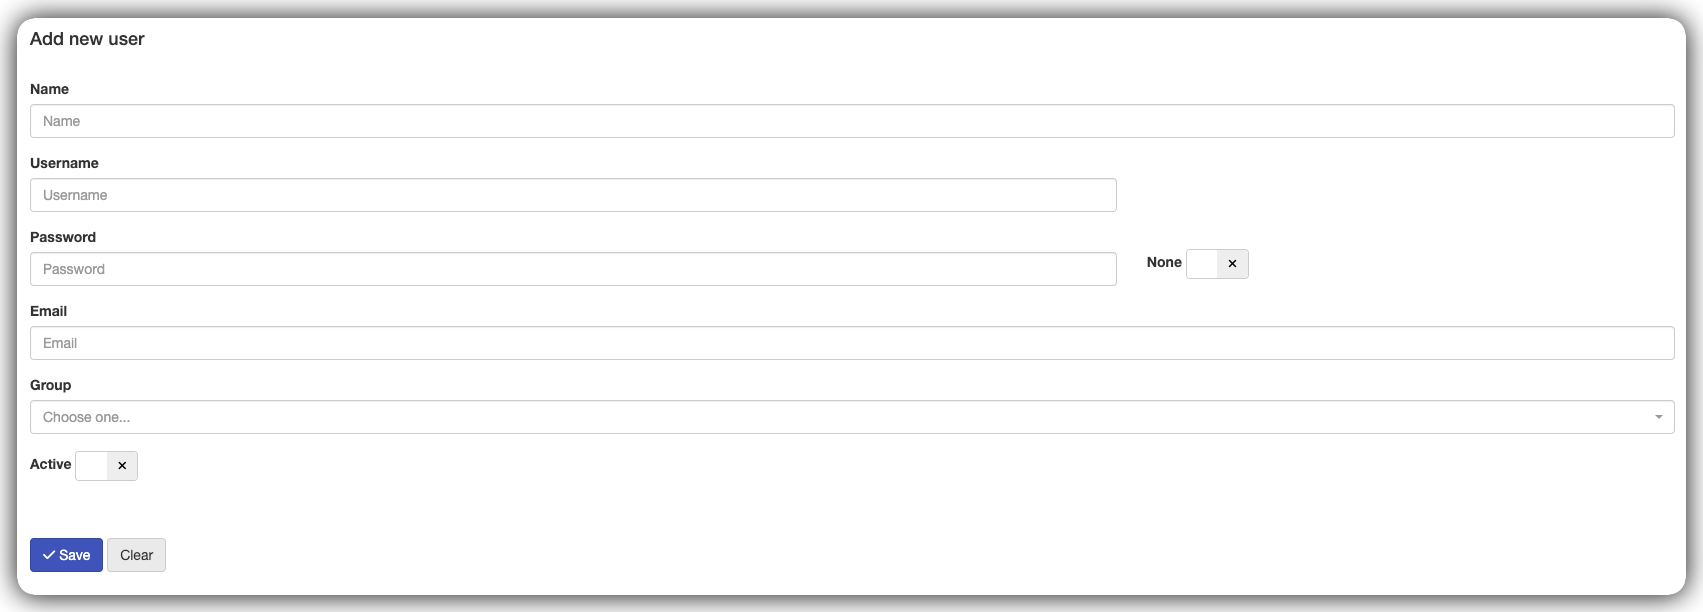
- Name: Enter the username.
- Username: Enter the login name - must contain only lowercase letters and be separated by a period.
- Password: Enter the new user's first system access password.
- Email: Enter the contact email.
- None: Allows you to block the user's password to prevent login.
- Group: Select the main group to which the user belongs.
- Active: Allows you to activate or deactivate a user in the system.
- Save Button: Click to save the new user's information.
3 - User Permissions
Permission management is done through an intuitive interface organized by tabs (Forms and Reports).
This allows you to configure in detail what the user can access immediately after creation or during editing.
In the Read, Write, and Delete columns, you will find a dropdown menu with different levels of scope:
- None: The user has no permission for this action.
- Owner: The user can only interact with records they themselves created.
- Group: The user can interact with records created by any member of their group.
- Everything: Full permission. The user accesses the records of all users and groups.
Forms Tab
In this tab, you control the user's interaction with the application's data entry modules.

For each listed form, you must define the following parameters:
-
Active: Defines visibility. If checked, the form will appear in the sidebar menu for the user.
-
Read: Sets the permission level to view records only.
-
Write: Defines whether the user has permission to enter new data or edit existing information.
-
Delete: Defines whether the user has the authority to remove records from the database.
Reports Tab
Similar to forms, this tab controls access to the modules for viewing and extracting analytical data.

For a report to be available, the Active option must be selected so that the user has permission to view it.
- Save: Click the "Save" button to save the changes.
4 - Action Buttons

-
Save: Save all changes made.
-
Clear: Clear all form fields, reverting to the initial "Add new user" state.
-
Impersonate: A powerful Netuno tool. After saving a user's permissions and clicking the "Impersonate" button, you can view the system exactly as the registered user will use it. This is essential for testing if the permissions have been configured correctly.
-
Delete: Permanently removes the user's record.
Group
This is the central panel for managing access profiles in Netuno, allowing you to perform two actions: "Add" a new group and "Edit" an existing group.
A group functions as a profile or access rule that determines what each set of users can view or do within the system.
Instead of configuring permissions individually for each user, you define them in the group and link users to it, ensuring scalable and organized administration.
By clicking on "Developer" in the upper right corner of the screen, access the "Group" section.
Requirements
- Administrative Access: You need to have a profile with administrator permissions to create or modify groups.
How to Add a New Group
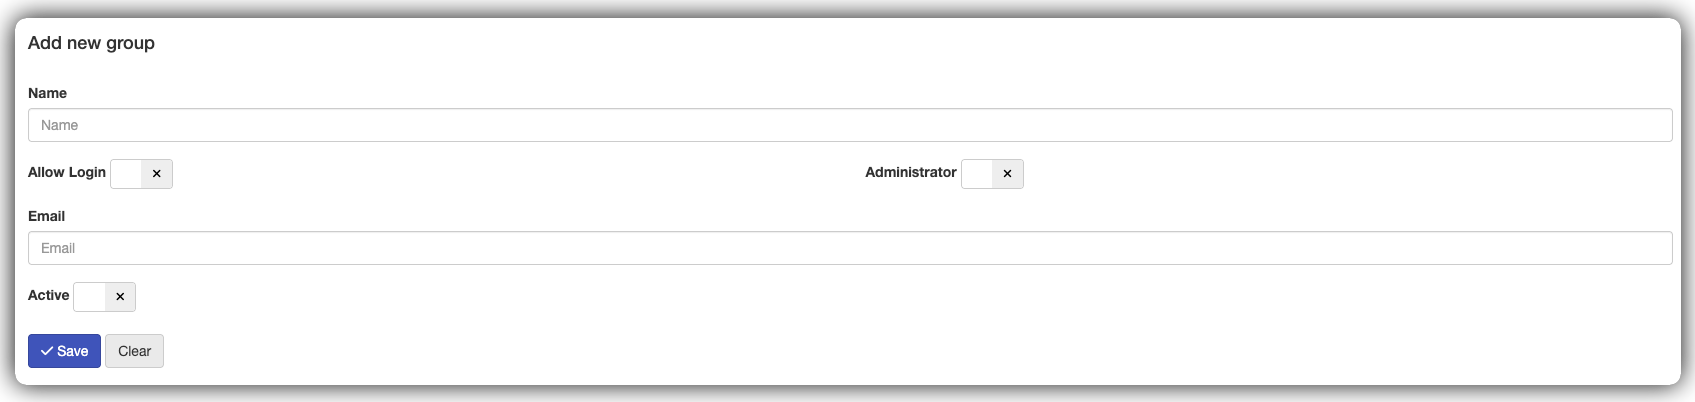
- Locate the "Add" section.
- Name: Give the group a clear and descriptive name.
- Allow Login: Check this option if users in this group should be able to log in to the system.
- Administrator: Check this option only if users in this group have full access to the system.
- Email: Enter a contact email for the group.
- Active: Check this option to activate the settings in the system.
- Save Button: Click to save the group settings.
- Clear Button: Click to clear all form fields.
How to Edit an Existing Group

- Select the registered group in the "Edit existing group" input at the top of the page.
- Click the "Select a group" checkbox.
- Choose the group you want to edit from the list.
- Wait for the group data to automatically fill in the fields (Name, Email, and options).
- Make the changes you want and click "Save".
Log History
The "Log History" screen is the logging and auditing tool for your application.
When a user creates, edits, or deletes a record in any form, the system saves a log of that action.
This page allows you to search and filter all of this history. This is essential for:
-
Security: Monitoring suspicious or unauthorized activities.
-
Auditing: Maintaining a compliance record of all data changes.
-
Diagnostics: Understanding how a specific record reached its current state. Example: "who deleted this client?".
How to Search the Log History

Fill in one or more "Filters" fields to find the log records you want to search for, then click the "Search" button.
- Access the "Log History" page.
- Fill in the desired filters to limit your search. It is not necessary to fill in all fields. Example: To see everything the user "Developer" did today:
- Select "Developer" in the User field.
- In the Start field, select today's date and time.
- In the End field, select today's date and time.
- Click the "Search" button.
- The results (the list of logs) will be displayed below the search form.
Logout
Click "Logout" to securely end your session on the system.