WebSocket
Instant messaging between server and client.
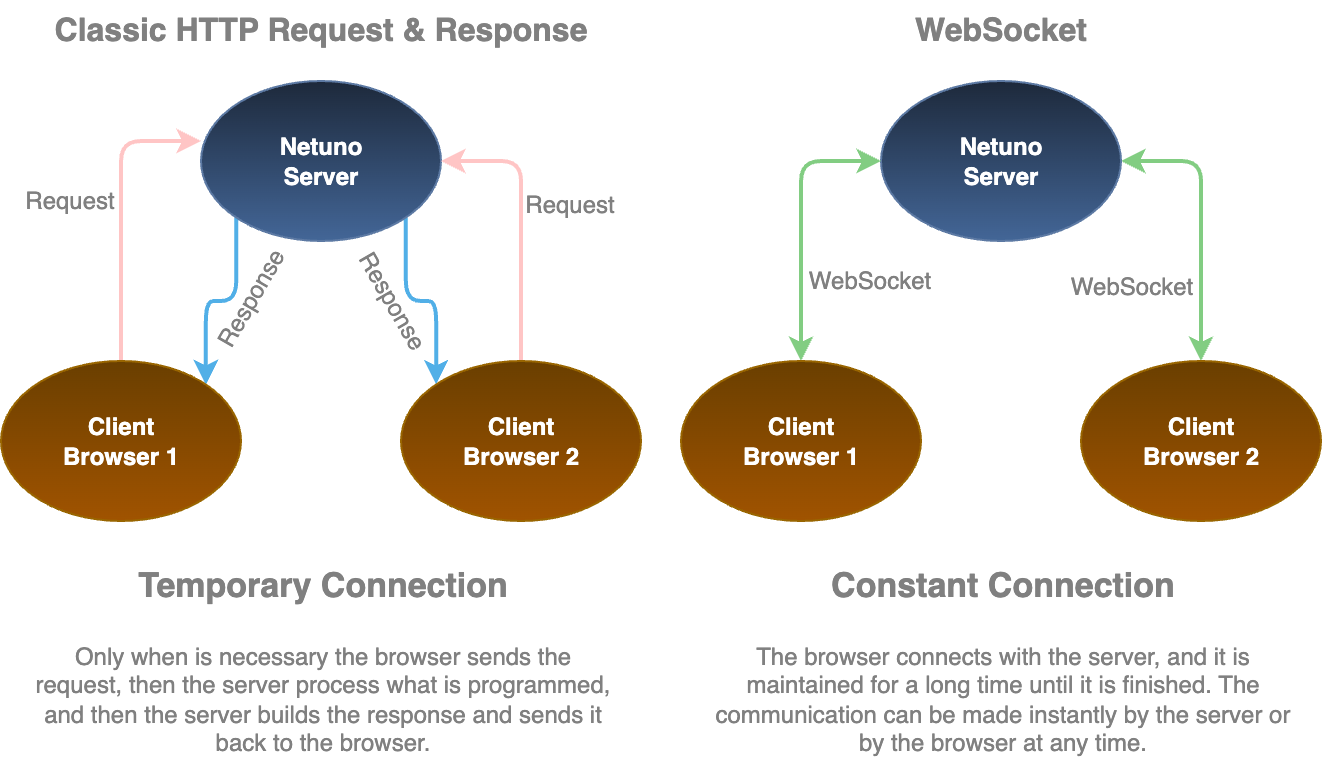
Introduction
With WebSocket, it is possible to establish a permanent connection between the server and the client browser.
This means that at any time, the browser can use the connection established via WebSocket to send data to the server, without necessarily receiving a response. The same applies to the server, which can contact the client browser, sending data immediately.
Communication is instantaneous, and at any time, data can be transferred from one side to the other independently and immediately.
It's very useful for performing real-time operations with immediate communication. It's like a chat, a conversation between the browser and the server. At any time, either can send a message and the other receives it.
For example, it's widely used in everything from general chat solutions to games. We also use it to present live data changes, that is, when there's a need for communication as immediately as possible.
In a nutshell, the difference between classic HTTP communication and WebSocket:
On the server side, an endpoint is created, an address that allows WebSocket connections to be established.
The server can send data only to a specific connection, meaning it can send new messages to a specific chat participant.
The server can also broadcast, which is when data is sent to all active connections at a specific address, meaning a message is sent to all chat participants in a room or group.
Activation and Configuration
To activate and configure WebSocket in your Netuno application, you need to edit the application configuration file for the environment you're using, such as:
📂 config/_development.json📂 config/_production.json
Enter and adjust the following parameters:
    ...
    "ws": {
        "hosts": [...], "<-- OPTIONAL": "more on this in the documentation below.",
        "endpoints": [
            {
                "name": "pool",
                "enabled": true,
                "sendTimeout": 10000,
                "idleTimeout": 0,
                "maxText": 15000,
                "public": "/ws/pool",
                "path": "/",
                "service": "/services/ws/pool"
            },
            {
                "name": "room",
                "enabled": true,
                "sendTimeout": 10000,
                "idleTimeout": 0,
                "maxText": 15000,
                "public": "/ws/room",
                "path": "/{uid}",
                "service": "/services/ws/room"
            }
        ]
    },
    ...
endpoints
It's an array that allows you to define whether the server will support WebSockets through multiple specified public addresses (endpoints), so each endpoint is a public address that supports receiving connections via WebSockets from browsers.
name
Endpoint identification name.
enabled
Allows you to enable and disable the endpoint, default is true (active).
sendTimeout
Maximum time limit for sending a message to clients. The default is 60000 milliseconds, which is
equivalent to 1 minute.
idleTimeout
Maximum time limit for connection inactivity, the default is 300000 milliseconds, that is, equivalent
to 5 minutes.
maxText
Limit in bytes for the maximum size of the message length, default is 1048576 equivalent to 1 megabyte.
public
Defines the base public address that will allow receiving WebSocket connections from browsers.
The final address consists of the value of the public configuration followed by the value defined in the path.
path
Defines the final part of the public address path. It can be dynamic, allowing you to create, for example, multiple separate channels. This is useful for creating multiple rooms.
Attention: The
pathmust always start with/, and in the connection configuration on the front-end, it is very important to contain the slash exactly as defined in thepath.
In the front-end the final address will be public + path, see the example:
    ...
    "public": "/ws/pool",
    "path": "/",
    ...
So the final address on the front-end will be /ws/pool/, with the trailing slash.
service
Address of the application's backend service base that handles connections and communication via WebSocket.
hosts
We can optionally define the hosts where our endpoints are available. In other words, the connection contains the host address in the HTTP header. This host, considering only the domain or IP address and disregarding the port number, is what is used to associate and find the corresponding endpoint.
Therefore, to work correctly, the endpoint needs to combine
hostandpublic+path, like this:
ws://[host]:9000[public][path]In production with NGINX, reverse proxy, and SSL, it should look like this:
wss://[host][public][path]
Netuno defines some local domains with the app name prefix, which it automatically associates as the default value
for endpoint hosts. In addition, in the app under development, it also adds localhost and
127.0.0.1 to the default hosts. Therefore, defining the hosts is optional, as this configuration is automatic.
The following hosts are automatically defined for endpoints if the app name is myapp:
- This one redirects directly to the local IP 127.0.0.1:
myapp.local.netu.no
- These must be registered in the operating system's hosts file to work:
myapp.localhostmyapp.local
If the app name is my_app, then these are the automatic hosts:
- This one redirects directly to the local IP 127.0.0.1:
my-app.local.netu.no
- These must be registered in the operating system's hosts file to work:
my-app.localhostmy-app.local
The
_(underscore) is not allowed in the domain, and the-(dash) is not allowed in the app name, so externally we use the-(dash) in the address, but Neptune automatically transforms the-(dash) into_(underscore) to find the right application.
The default application, or the application defined when the Netuno server starts, also has the following hosts:
localhost127.0.0.1
To define custom hosts, we use the following configurations:
    ...
    "ws": {
        "endpoints": [
            {
                "hosts": ["my-domain1.com", "www.my-domain1.com"],
                ...
            },
            {
                "hosts": ["my-domain2.com", "www.my-domain2.com"],
                ...
            }
        ]
    },
    ...
If all endpoints work for the same hosts, then we can define them globally like this:
    ...
    "ws": {
        "hosts": ["my-domain.com", "www.my-domain1.com"],
        "endpoints": [
            ...
        ]
    },
    ...
Make sure that the WebSocket endpoint address always uses a valid host domain or IP address. Otherwise, it won't work because the endpoint can't be found internally.
Endpoint Service
POST = new connection
The service configured with the POST method is executed when a new connection is established, for example:
- JavaScript
- Python
- Ruby
- Kotlin
- Groovy
const uidRoom = _ws.path().getString("uid")
const dbRoom = _db.get("room", uidRoom)

if (dbRoom == null) {
    _log.warn(`Invalid room ${uidRoom}.`)
    _ws.close()
} else {
    _log.info(`New WebSocket Session: ${_ws.sessionId()}`)
}
uidRoom = _ws.path().getString("uid")
dbRoom = _db.get("room", uidRoom)

if dbRoom == null:
    _log.warn(f"Invalid room {uidRoom}.")
    _ws.close()
else:
    _log.info(f"New WebSocket Session: {_ws.sessionId()}")
uidRoom = _ws.path().getString("uid")
dbRoom = _db.get("room", uidRoom)

if dbRoom == null
    _log.warn("Invalid room #{uidRoom}.")
    _ws.close()
else
    _log.info("New WebSocket Session: #{_ws.sessionId()}")
end
val uidRoom = _ws.path().getString("uid")
val dbRoom = _db.get("room", uidRoom)

if (dbRoom == null) {
    _log.warn("Invalid room ${uidRoom}.")
    _ws.close()
} else {
    _log.info("New WebSocket Session: ${_ws.sessionId()}")
}
def uidRoom = _ws.path().getString("uid")
def dbRoom = _db.get("room", uidRoom)

if (dbRoom == null) {
    _log.warn("Invalid room ${uidRoom}.")
    _ws.close()
} else {
    _log.info("New WebSocket Session: ${_ws.sessionId()}")
}
Normally
_ws.sessionId()is saved in a database to be used in future communications.
PUT = new message
If the received message is not in JSON format, or if it is JSON that is not in a supported format for running a specific service, then this generic service will be executed:
- JavaScript
- Python
- Ruby
- Kotlin
- Groovy
_log.info(`The session ${_ws.sessionId()} sent this message: ${_ws.message()}`)
_log.info(f"The session {_ws.sessionId()} sent this message: {_ws.message()}")
_log.info("The session #{_ws.sessionId()} sent this message: #{_ws.message()}")
_log.info("The session ${_ws.sessionId()} sent this message: ${_ws.message()}")
_log.info("The session ${_ws.sessionId()} sent this message: ${_ws.message()}")
DELETE = closed the connection
Executed when the client browser disconnects.
- JavaScript
- Python
- Ruby
- Kotlin
- Groovy
_log.info(`Session ${_ws.sessionId()} has disconnected.`)
_log.info(f"Session {_ws.sessionId()} has disconnected.")
_log.info("Session #{_ws.sessionId()} has disconnected.")
_log.info("Session ${_ws.sessionId()} has disconnected.")
_log.info("Session ${_ws.sessionId()} has disconnected.")
GET = continuous message stream
It starts execution when a new connection occurs from the client's browser, and execution continues until the connection ends.
In other words, the service for the HTTP GET method continuously receives messages from the client
in a stream, meaning it is an open and continuous flow of messages that can both receive and send.
- JavaScript
- Python
- Ruby
- Kotlin
- Groovy
if (_ws.isStream()) {
    while (_ws.awaitStream()) {
        if (_ws.isBinaryStreamed()) {
            _log.info("New binary message received: "+ _convert.textFromBytes(_ws.binaryStreamed()))
        } else if (_ws.isTextStreamed()) {
            _log.info("New text message received: "+ _ws.textStreamed())
        }
        _ws.sendText("Ok! The message was received successfully.")
    }
}
if _ws.isStream():
    while _ws.awaitStream():
        if _ws.isBinaryStreamed():
            _log.info("New binary message received: "+ _convert.textFromBytes(_ws.binaryStreamed()))
        elif _ws.isTextStreamed():
            _log.info("New text message received: "+ _ws.textStreamed())
        _ws.sendText("Ok! The message was received successfully.")
if _ws.isStream()
    while _ws.awaitStream()
        if _ws.isBinaryStreamed()
            _log.info("New binary message received: "+ _convert.textFromBytes(_ws.binaryStreamed()))
        elsif _ws.isTextStreamed()
            _log.info("New text message received: "+ _ws.textStreamed())
        end
        _ws.sendText("Ok! The message was received successfully.")
    end
end
if (_ws.isStream()) {
    while (_ws.awaitStream()) {
        if (_ws.isBinaryStreamed()) {
            _log.info("New binary message received: "+ _convert.textFromBytes(_ws.binaryStreamed()))
        } else if (_ws.isTextStreamed()) {
            _log.info("New text message received: "+ _ws.textStreamed())
        }
        _ws.sendText("Ok! The message was received successfully.")
    }
}
The if with _ws.isStream() makes it check whether it is actually an internal request managed by the WebSocket
to perform the stream.
In the while loop with _ws.awaitStream(), you wait for a new message stream to arrive, that is, you wait for
a new message to arrive. As soon as a new message arrives, the while code inside is executed.
The
_ws.awaitStream()works like an infinite loop waiting for a new message.
Then, in the internal if statements of the while, the message type is checked, whether the message is binary
or text. In both cases, the content of these messages is displayed in the logs. Note that any message format
can be used, and they can be processed in any convenient way.
Finally in _ws.sendText a response message is sent to the client, confirming reception.
Each execution of the
GETservice will be an active connection.
When the connection to the WebSocket endpoint is terminated, then the execution of this service is terminated internally.
Communication
sendService
Executes the service and sends the generated output to a specific client connected via WebSocket, using the
client's connection ID (sessionId).
Service Call Example
The code below can be used in the endpoint's PUT method service (service). Note that _ws.sessionId() is
being used to obtain the client's connection session ID. If the session identifier
is stored in a database, sendService could be executed in any other service at any time.
- JavaScript
- Python
- Ruby
- Kotlin
- Groovy
const uid = _ws.path().getString("uid")
_ws.sendService(
    _ws.sessionId(), // Identification of the current WebSocket connection.
    _val.map() // Parameterization of the service that will be executed.
        .set("method", "POST")
        .set("service", "/services/room/participant/new")
        .set(
            "data", // Parameters that will be passed to the service and received through _req.
            _val.map()
                .set("uid", uid)
        )
)
const uid = _ws.path().getString("uid")
_ws.sendService(
    _ws.sessionId(), # Identification of the current WebSocket connection.
    _val.map() # Parameterization of the service that will be executed.
        .set("method", "POST")
        .set("service", "/services/room/participant/new")
        .set(
            "data", # Parameters that will be passed to the service and received through _req.
            _val.map()
                .set("uid", uid)
            )
        )
const uid = _ws.path().getString("uid")
_ws.sendService(
    _ws.sessionId(), // Identification of the current WebSocket connection.
    _val.map() // Parameterization of the service that will be executed.
        .set("method", "POST")
        .set("service", "/services/room/participant/new")
        .set(
            "data", // Parameters that will be passed to the service and received through _req.
            _val.map()
                .set("uid", uid)
            )
        )
In other words, in the configuration, the path configured in the endpoint has the value /{uid}, thus
allowing the client to connect through the public address:
/ws/room/d641f095-30eb-4025-a39c-b2e3e497eab7
Then the value of uid will be d641f095-30eb-4025-a39c-b2e3e497eab7.
After that, the service located at the URL /services/room/participant/new will be executed and the value
of uid is passed.
The uid can be obtained in the code of the service that is executed, as a parameter of the HTTP request,
see an example:
- JavaScript
- Python
- Ruby
- Kotlin
- Groovy
// The UID sent is obtained directly from the request.
const uid = _req.getString('uid')
# The UID sent is obtained directly from the request.
uid = _req.getString('uid')
# The UID sent is obtained directly from the request.
uid = _req.getString('uid')
// The UID sent is obtained directly from the request.
val uid = _req.getString('uid')
// The UID sent is obtained directly from the request.
final uid = _req.getString('uid')
broadcastService
To broadcast, you need the name of the WebSocket endpoint, define the path (path) if applicable, and the
service that will be executed.
The service output will be sent to all active connections on the specified
endpoint.
Exemplo de Broadcast
- JavaScript
- Python
- Ruby
- Kotlin
- Groovy
_ws.broadcastService(
    "admin", // WebSocket endpoint name.
    "/", // Path configured on the endpoint (path).
    _val.map() // Parameterization of the service that will be executed.
        .set("service", "/services/room/participant/list")
)
_ws.broadcastService(
    "admin", # WebSocket endpoint name.
    "/", # Path configured on the endpoint (path).
    _val.map() # Parameterization of the service that will be executed.
        .set("service", "/services/room/participant/list")
    )
_ws.broadcastService(
    "admin", # WebSocket endpoint name.
    "/", # Path configured on the endpoint (path).
    _val.map() # Parameterization of the service that will be executed.
        .set("service", "/services/room/participant/list")
    )
_ws.broadcastService(
    "admin", // WebSocket endpoint name.
    "/", // Path configured on the endpoint (path).
    _val.map() // Parameterization of the service that will be executed.
        .set("service", "/services/room/participant/list")
    )
_ws.broadcastService(
    "admin", // WebSocket endpoint name.
    "/", // Path configured on the endpoint (path).
    _val.map() // Parameterization of the service that will be executed.
        .set("service", "/services/room/participant/list")
    )
In this example, the output content generated by the room/participant/list service will be sent to everyone
connected to the admin endpoint.
WS Client - NPM
To easily integrate with the frontend, the NPM module is available:
Installation command:
bun install @netuno/ws-client
_ws.config({
    url: 'ws://localhost:9000/ws/example',
    servicesPrefix: '/services',
    method: 'GET',
    autoReconnect: true,
    connect: (event) => {
        console.info('WebSocket Connected', event);
    },
    close: (event) => {
        console.warn('WebSocket Closed', event);
    },
    error: (error) => {
        console.error('WebSocket Error', error);
    },
    message: (data, event) => {
        console.debug('WebSocket Message', data);
    }
});
Make sure the URL correctly matches the values configured in the endpoint for
hostandpublic+path, like this:
ws://[host]:9000[public][path]The production URL with NGINX integration, reverse proxy, and SSL will probably look like this:
wss://[host][public][path]
A seguir pode iniciar a conexão:
_ws.connect();
Running a Service via WebSocket
We can run REST API services via a WebSocket connection. This means that no HTTP request will be made. The request data is sent as a message, and the service response is received as a message.
Before starting, we must create an observer for the service response, for example:
const listenerRef = _ws.addListener({
    method: 'GET', // Optional, default is GET.
    service: 'path/of/my/service/here',
    success: (data) => {
        console.log('Resposta do serviço executado via WebSocket:', data);
    },
    fail: (error)=> {
        console.log('O serviço executado via WebSocket falhou:', error);
    }
});
Now we can send a request to execute the service, and the service's response will be obtained from the observer created above. We execute the service like this:
_ws.sendService({
    method: 'GET', // Optional, another HTTP method can be used.
    service: 'path/of/my/service/here',
    data: {
        message: 'Hi...'
    }
});
To remove the added observer, use:
_ws.removeListener(listenerRef);
And to close the WebSocket connection:
_ws.close();
NGINX Reverse Proxy
In NGINX the reverse proxy can be configured like this:
    location /ws {
        proxy_pass http://localhost:9000;
        proxy_set_header Host my-app.local.netu.no;
        proxy_set_header X-Real-IP $remote_addr;
        proxy_set_header X-Forwarded-For $proxy_add_x_forwarded_for;
        proxy_set_header Upgrade $http_upgrade;
        proxy_set_header Connection "Upgrade";
        proxy_http_version 1.1;
        proxy_read_timeout 86400s;
        proxy_send_timeout 86400s;
        add_header X-Frame-Options "";
    }
In line 3, where you define
Host, themy-apppart should be adjusted to the corresponding name of the Netuno application. If there is_in the application name, then theHostaddress should be replaced by-. For example, themy_appapplication will have theHostvaluemy-app.local.netu.no.
Restart NGINX for the configuration to take effect.
The domains configured in NGINX, i.e., the server_name parameterization, do not need to be on the endpoint hosts
in the Netuno application, because the proxy configuration above changes the Host in the HTTP header
to a default address that is automatically configured by Netuno, as long as the prefix with the application name
is correct.
If the NGINX server uses port 80, the final URL will be:
ws://[host][public][path]
And with SSL/HTTPS, if the NGINX server uses port 443, the final URL will be:
wss://[host][public][path]