JWT Authentication (JSON Web Token)
Setting up and using token authentication.
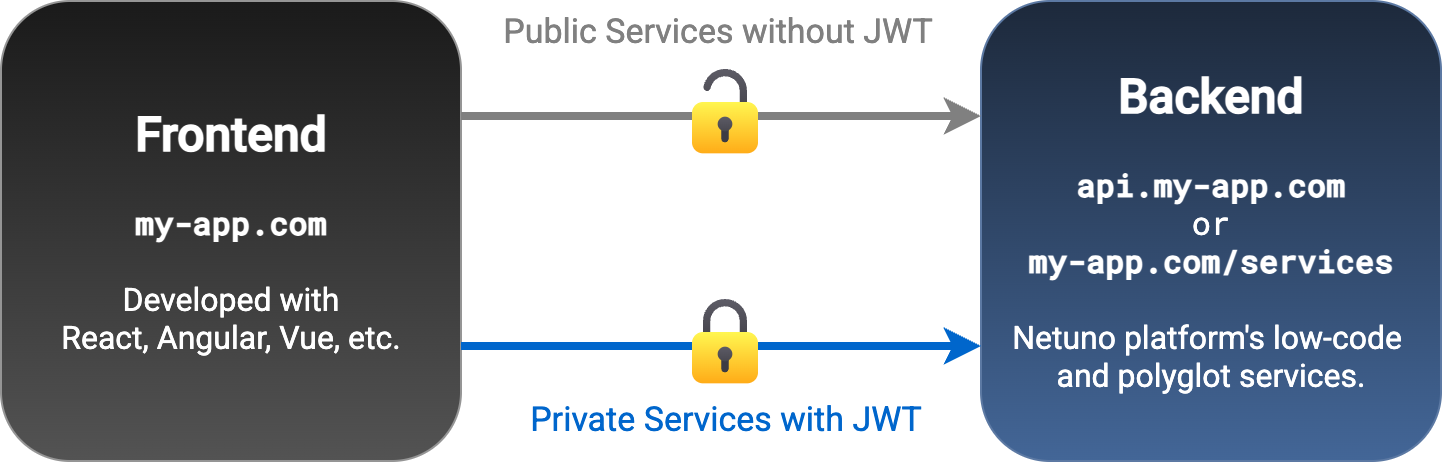
Introduction
JWT (JSON Web Token) is a standard for ensuring the security and context of authentication in web applications, where the frontend is decoupled from the backend.
It is commonly used when the frontend of a web application is developed in ReactJS, AngularJS, VueJS, etc., and the backend provides a REST API to provide and receive dynamic data from the application.
The token (JWT) is a secure code that identifies the user.
With JWT (JSON Web Token), the backend's REST API allows private services to obtain the authentication context to determine who the authenticated user is. In other words, from the token, we can determine who the user is, the token in this case being a JWT (JSON Web Token).
CORS
The REST API can be located on a different subdomain than the website, which requires CORS (Cross-Origin Resource Sharing) configurations for services to be accessed.
Therefore, if the REST API is on a different domain/subdomain than the frontend, even when using JWT, CORS must be correctly configured.
CORS is a security policy for resource consumption across different domains, subdomains, or ports. To ensure that one address can actually integrate with another address.
This happens because browsers block the use of services, or other types of resources, on external addresses to prevent attacks that attempt to obtain sensitive data.
Activation and Configuration
To activate and configure JWT in your Netuno application, you need to edit the application configuration file for the environment you are using, such as:
config/_development.jsonconfig/_production.json
Depending on the environment configured in Netuno, see the
netuno/config.jsfile for theconfig.envparameterization.
Insert and adjust the following parameters:
    ...
    "auth": {
        "jwt": {
            "enabled": true,
            "secret": "ThisSecretMustBeWith32Characters",
            "expires": {
                "access": 1440,
                "refresh": 1440
            }
        }
    },
    ...
In the secret parameter, enter a complex, random string of characters. This is the key that will ensure the
security of the JWT encryption.
The expires parameters are set in minutes, for example: 60, which is equivalent to 1 hour, and 1440, which
is equivalent to one day.
Restricted Access to Groups
You can also pass the groups parameter, which defines the group code of users who can authenticate with JWT,
for example:
    ...
    "auth": {
        "jwt": {
            ...
            "groups": ["customer", "supplier"],
            ...
        }
    },
    ...
In the example above, only users belonging to the following groups are allowed:
- Customers, with the group code being
customer. - Suppliers, with the group code being
supplier.
Only users in these groups can authenticate with JWT.
How to Obtain the Access Token
To obtain the JWT Access Token, Netuno provides the auth service that validates authentication and, if successful, returns the Access Token and the Refresh Token.
The Access Token is obtained as follows:
Fetch - Pure JavaScript
JavaScript in browsers provides the fetch function to integrate with backend REST API services.
Below are some examples of how to authenticate with JWT and renew the token.
Authentication
Example of how to obtain the Access Token with fetch:
fetch("http://localhost:9000/services/_auth", {
    method: 'post',
    headers: {
        'Content-Type': 'application/json',
        'Accept': 'application/json'
    },
    body: JSON.stringify({
        username: payload.username,
        password: payload.password,
        jwt: true
    })
}).then((response) => {
	if (response.status != 200) {
        if (response.status != 403) {
            console.log('Authentication failed with unexpected status:', response.status);
        }
        alert('Invalid login.');
        return null;
    }
    return response.json();
}).then((res) => {
    if (res && res.result === true) {
        console.log(`My Access Token: ${res.access_token}`);
        console.log(`My Refresh Token: ${res.refresh_token}`);
        console.log(`Expires: ${res.expires_in} minutes`);
        sessionStorage.setItem('token', JSON.stringify(res));
    }
}).catch((error)=> {
    console.log(error);
    alert('There was a technical problem, please try again later.');
});
Note that the token must be stored as a session, so it's preferable to use
sessionStorage
instead of localStorage for greater security.
With refresh_token, you can generate a new token before the expiration time (expires_in in minutes).
Using the Access Token in Other Services
To run custom-programmed services that require prior authentication in Netuno applications, you must pass the Access Token in the HTTP protocol header as the value of the Authorization key, for example:
Authorization: Bearer eyJhbGciOiJIUzU...
Example of how to run a custom-programmed service through the frontend using
fetch, where
Authorization is passed in the headers:
const token = JSON.parse(sessionStorage.getItem("token"));

fetch("http://localhost:9000/services/my-service", {
    method: 'post',
    credentials: 'include',
    headers: {
        'Authorization': `${token.token_type} ${token.access_token}`,
        'Content-Type': 'application/json'
    },
    body: JSON.stringify({
        meuParametro1: '...',
        meuParametro2: '...'
    })
}).then((response) => {
    if (response.status != 200) {
    	console.log(`Service failed with status ${response.status}.`);
        if (response.status == 403) {
            alert('Not authenticated.');
        } else {
            alert('There was a failure with the service.');
        }
        return null;
    }
    return response.json();
}).then((res) => {
    if (res) {
        console.log(`My service response data:`, res);
        alert('Service executed successfully.');
    }
}).catch((error)=> {
    console.log(error);
    alert('There was a technical problem, please try again later.');
});
Note that, in the HTTP Headers, the Authorization parameter uses the token_type and access_token
obtained from the JWT object previously saved during authentication in
sessionStorage.
Refresh with Refresh Token
To refresh the token and extend authentication, you must call the _auth service again, but in addition to
the jwt: true parameter, you must also pass the refresh_token parameter with the value received in the
previous successful authentication.
The token must be refreshed before the expiration time (expires_in in minutes).
So, to extend authentication and renew the token, see the example:
const token = JSON.parse(sessionStorage.getItem("token"));

fetch("http://localhost:9000/services/_auth", {
    method: 'post',
    headers: {
        'Content-Type': 'application/json',
        'Accept': 'application/json'
    },
    body: JSON.stringify({
        refresh_token: token.refresh_token,
        jwt: true
    })
}).then((response) => {
    if (response.status != 200) {
        if (response.status != 403) {
            console.log('Token renewal failed with unexpected status:', response.status);
        }
        alert('Access renewal with invalid token.');
        return null;
    }
    return response.json();
}).then((res) => {
    if (res && res.result === true) {
        console.log(`My New Access Token: ${res.access_token}`);
        console.log(`My New Refresh Token: ${res.refresh_token}`);
        console.log(`Expires: ${res.expires_in} minutes`);
        sessionStorage.setItem("token", JSON.stringify(res));
    }
}).catch((error)=> {
    console.log(error);
    alert('There was a technical problem, please try again later.');
});
Once you obtain the new token, you should use it instead of the previous one in future service calls.
This way, authentication is prolonged with successive token renewals, ensuring that the user remains authenticated.
Auth Client - NPM
To easily integrate with the frontend, the NPM module is available:
On the frontend, you can install it with Bun:
bun install @netuno/auth-client
Another frontend dependency manager such as PNPM, NPM, YARN, or another can be used.
Configuration
This module depends on @netuno/service-client, when defining the service address, for example:
import _service from '@netuno/service-client';
...
_service.config({
    prefix: 'http://localhost:9000/services/'
});
The auth-client uses the service-client prefix to internally construct the _auth service address.
In this case, following the example, it would be:
http://localhost:9000/services/_auth
This address is then automatically constructed using the address prefix of the Netuno application's REST API services.
See how to customize the auth-client settings:
_auth.config({
    storage: 'local', // ession is the default value.
    onLogin: () => { alert("Logged in!"); },
    onLogout: () => { alert("Logged out!"); }
});
If you want the token to be saved in localStorage, then you need to define storage: 'local' in the
configuration, because by default it is storage: 'session' using sessionStorage.
Authentication
To log in using _auth:
import _auth from '@netuno/auth-client';
...
_auth.login({
    username: "admin",
    password: "secret",
    success: ()=> {
        alert("Success.");
    },
    fail: ()=> {
        alert("Fail.");
    }
});
The token is automatically saved in session (sessionStorage) or local (localStorage), depending on the
configuration. By default, it is session.
Refresh the Token
Example of how to refresh the token:
import _auth from '@netuno/auth-client';
...
_auth.refreshToken({
    success: ()=> {
        alert("Success.");
    },
    fail: ()=> {
        alert("Fail.");
    }
});
The token is automatically saved in session (sessionStorage) or local (localStorage), depending on the
configuration. The default is session.
Removing the Token
Example of how to end the session, that is, the process of logging out and deleting the token:
import _auth from '@netuno/auth-client';
...
_auth.logout();
The token is removed from sessionStorage or localStorage depending on the configuration, the default is
sessionStorage.
Backend - REST API Services
If the Authorization header is passed during integration with the services with a valid token, it is possible
to identify the user and group.
In the backend, we can use the _user and _group resources, which identify the user and group,
respectively.
To view the authenticated user's data, we use the User resource, for example:
- JavaScript
- Python
- Ruby
- Kotlin
- Groovy
_log.info(
    "Authenticated user:",
    _val.map()
        .set("id", _user.id())
        .set("name", _user.name())
        .set("code", _user.code())
        .set("all", _user.data())
)
_log.info(
    "Authenticated user:",
    _val.map()
        .set("id", _user.id())
        .set("name", _user.name())
        .set("code", _user.code())
        .set("all", _user.data())
    )
_log.info(
    "Authenticated user:",
    _val.map()
        .set("id", _user.id())
        .set("name", _user.name())
        .set("code", _user.code())
        .set("all", _user.data())
    )
_log.info(
    "Authenticated user:",
    _val.map()
        .set("id", _user.id())
        .set("name", _user.name())
        .set("code", _user.code())
        .set("all", _user.data())
    )
_log.info(
    "Authenticated user:",
    _val.map()
        .set("id", _user.id())
        .set("name", _user.name())
        .set("code", _user.code())
        .set("all", _user.data())
    )
To see the authenticated user's group, we use the Group resource, for example:
- JavaScript
- Python
- Ruby
- Kotlin
- Groovy
_log.info(
    "Authenticated group:",
    _val.map()
        .set("id", _group.id())
        .set("name", _group.name())
        .set("code", _group.code())
        .set("all", _group.data())
)
_log.info(
    "Authenticated group:",
    _val.map()
        .set("id", _group.id())
        .set("name", _group.name())
        .set("code", _group.code())
        .set("all", _group.data())
    )
_log.info(
    "Authenticated group:",
    _val.map()
        .set("id", _group.id())
        .set("name", _group.name())
        .set("code", _group.code())
        .set("all", _group.data())
    )
_log.info(
    "Authenticated group:",
    _val.map()
        .set("id", _group.id())
        .set("name", _group.name())
        .set("code", _group.code())
        .set("all", _group.data())
    )
_log.info(
    "Authenticated group:",
    _val.map()
        .set("id", _group.id())
        .set("name", _group.name())
        .set("code", _group.code())
        .set("all", _group.data())
    )
Security
If the token is invalid, or if the Authorization is not passed, Netuno ensures that the service will not run,
unless the service is configured for public access; by default, services are private.
To manage whether the service is public or private, configure it in your application in:
server/core/_service_config.js
In development, Netuno allows you to run private services directly without authentication.
For convenience, most programmed services typically don't require authentication, making development and testing easier overall.
If the service isn't in development, for example, in production, then services can only be run with authentication, obviously.
Authentication Resource
Normally, the _user and _group resources are sufficient, but there are situations where we want to perform
more advanced operations and in this case, we have the _auth resource.
The _auth resource is the main authentication resource; it manages configurations and has all operations
related to the authentication process.
To learn more, see the [Auth] resource documentation (/docs/library/resources/auth).
ReAuthKit
Netuno provides a base project for creating platforms with online authentication, which includes account creation, login, profile, avatar, password recovery, and much more.
Check it out on GitHub:
ReAuthKit is a Netuno application with a frontend built in React, Ant.Design, and React Router, and a database in PostgreSQL.
ReAuthKit greatly speeds up the creation of new projects with authentication, because it already has all the mechanisms necessary for any project that requires authentication.
Conclusion
It's easy to configure and enable JWT (JSON Web Token) authentication in your applications.
Use JWT authentication to develop secure REST API services.
JWT integration on the frontend can be used directly with fetch.
To streamline and standardize implementation, the NPM module @netuno/auth-client is available, which can be used with any frontend technology.
Whenever you need to identify the user when executing REST API services, use JWT authentication.
On the backend, configuring and obtaining the authenticated user is very simple.